Voltlog #165 – USAMS 3 Port USB Charger With Display Review & Teardown

In this video I am taking a look at the USAMS 3 Port USB Charger With Display. Turns out the same charger is sold under many different names, and I suspect inside there is the same circuit labeled USB320G.

Like I mentioned in the past China is improving the designs of these charger each year so the situation is much better now than it was a few years back. There would still be the $2 death traps disguised as apple chargers but in the $10 range you can get some pretty decent chargers with adequate protection. This charger has the required protection features to make it safe to use however its not special in any way, the noise level is higher than I would like and the output current of just 3A is not enough for charging 3 devices. Not even 2 at the same time if they both require more current.

Here are links to where you can find this charger: BanggoodAliexpress,  Amazon.

Voltlog #132 – 4 Digit LED Panel Meter Review

Do I recommend getting this module? Yes, the accuracy is good, the resolution is nice 10mV 1mA and you also have the option for adjusting it manually for both voltage and current.

The design is pretty simple, I believe the microcontroller is an STM8S so hacking it and rewriting the firmware should be pretty easy but it already does what it’s supposed to do so I don’t see a point to hacking this module. I think you would be better off designing a panel meter from scratch.

Buy this panel meter from here.

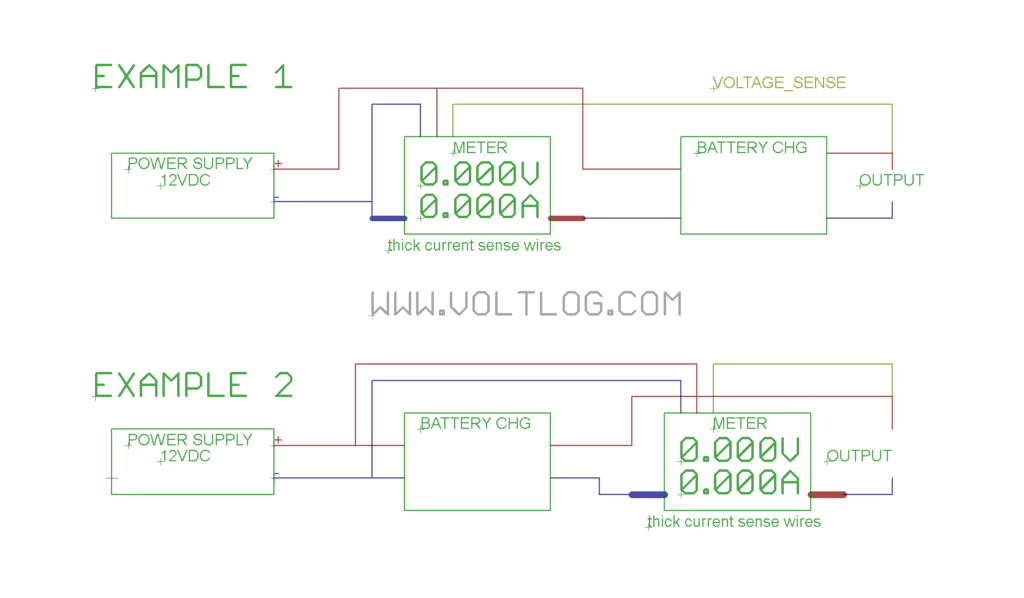
Someone asked on youtube how should a panel like this be wired up, so here is a wiring diagram that you can use. In this wiring diagram our goal is to monitor the voltage and current for charging a battery.

Example 1 shows the panel meter connected before the battery charging module, which means it will measure everything, even the power losses in the battery charging module.

Example 2 shows the panel meter connected after the battery charging module, which means it will only measure current flowing into the battery or whatever load you have on the output.

In both cases voltage sensing is done right at the output but that wire can be moved according to your needs. Also in both cases the panel meter gets power directly from the power supply because at that point the voltage is constant.

The main thing to remember here is that these panel meters are designed for low side current sensing, that means the ground of the logic board of the meter is connected with the input of the shunt resistor.

Voltlog #127 – 0-60V 0-10A 1mV 1mA Panel Meter Review

So I discovered this module a few months ago and it’s been sitting in a box since then, I almost forgot about it, until a few days ago when I decided it will be a good idea to do a video on the subject.

Let me give you a few details on the specs of this module and as usual it’s pretty difficult to find the information as it’s the case with every new module coming out of China. First of all we have an input range of 0-60V and 0-10A and a 5V rail is needed to power the module itself. It has a voltage measuring accuracy of ±0.2% + 0.2% full scale which sounds strange because these figures are usually given in a percentage plus or minus a number of least significant digits. The current measuring accuracy is ±0.4% + 0.3% full scale.

The meter is basically capable of measuring with a resolution of 1mv and 1mA (however the accuracy is quite bad, as shown in the video) which is quite nice and useful (not really useful with bad accuracy) for projects like DIY power supplies or DIY electronic loads. It can also display the power in watts with a resolution of 1mW as well as showing the load impedance.

Here are some links to this product:

Voltlog #126 – How fast can you update an e-paper display?

Welcome to a new voltlog, today we are going to answer the question how fast can you update an e-paper display, is it suitable to display live updating values from a sensor for example? Some people asked these questions in the comments of previous videos so I am doing some tests to try and answer these questions.

Now there will be a big difference between trying to update the whole screen and trying to update just a small section. And that delay might also be related to how fast the processor can send the information to the display. So for example measuring the time passed between sending the first byte of data to the display and the last byte going out is not that relevant, it might just be a slow processor, and the display could accept data much faster.

Also in the case of an Arduino the ram size is very limited so a full buffer could not be implemented. This means sending of the data to the display is done inefficiently increasing the time it takes for a full update.

Link e-paper display black/white:

More resources below:

Voltlog #125 – Banggood E-Paper Display Fiasco

This is just a short follow-up on the e-paper display video. It was brought to my attention by one of the viewers that banggood is shipping the bare display instead of the module as whole display + pcb + cable.

Link e-paper display black/white:

More resources below:

Voltlog #124 – Getting Started With E-Paper Display Module

In this video I’m gonna show you how to load a custom image on the e-paper display. Let’s see how easy it is to get started working with one of these e-paper display modules and an Arduino board.

Link e-paper display black/white:

More resources below:

Voltlog #31 – InTheMail

Usually when I order stuff from China mainland to Romania it takes about 3-4 weeks to arrive while stuff from Hong Kong takes about 5 weeks to arrive. However every year orders placed starting from about 15th of November up to 31st of December take very long to arrive sometimes even arriving after 8-9 weeks. So right now about a third of my orders are late or missing because there is also a good chance they will never arrive once they go past the 8 weeks mark.

A list with links for all the items shown is in the video description so do check them out.